Wizard Mode is easy to use
 Overview

Jar2Exe is easy to use. You can simply follow its steps to make your exe files from jar files.
Some features are OS dependent, so if there is a "Not Support Linux", maybe this concept does not exist on Linux, or Jar2Exe has not implemented for Linux. ![]() See Windows and Linux page for details.
See Windows and Linux page for details.
If there is a "Not Authorized" on some of the buttons, it means that your Jar2Exe has not been registered, you can use not-authorized features for developing use only. If you want to redistribute generated exe to others, you need to purchase a Standard License. ![]() See License page for details of licenses.
See License page for details of licenses.
Wizard Steps
Jar2Exe Wizard has 8 steps all, 6 steps is for creating exe file, one step for registration of Jar2Exe, one step for configuration after generated.
Step 0: Register
Register step is to activate Jar2Exe. After activation, generated exe files of this Jar2Exe can be redistributed to your customers as a product. Without registration, all features will not expire for developing use.
You can activate Jar2Exe online with the username and password of your account at this site (http://jar2exe.com) after purchase. Or activate Jar2Exe with "Register User" and "Register Key" if you purchase from RegNow.
- See Step 0: Register page for usage of activating.
- Go User Account page to register an account, view your orders.
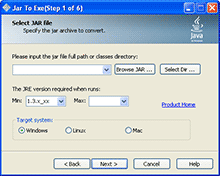
Step 1: Select Jar
The Select Jar step is to select a jar file or a classes directory, which you want to generate to exe file.
At this step, you can select minimum java.version required for your program. You can select a target platform to generate a exe file for.
- See Step 1: Select Jar page for usage of selecting a jar file.
- See Windows and Linux page for details of OS dependent features.
Step 2: Select Type
To Select what type of exe file to generate from the jar file. There are 3 types for Windows, 2 types for Linux.
- See Step 2: Select Type page for usage of selecting a type.
- See 3 Types of Applications page for induction of generated exe types.
Step 3: Main Class
The Main Class step is to select a class as the entrance of your java program, which has "public static void main(String [] argv)" defined.
If you selected "Windows GUI type" at the previous step, you can select a picture to be the spash window.
If you selected "Service type" for Windows, you need to configure the Service Name at this step.
- See Step 3: Main Class page for usage of selecting the main class.
- See Splash Window page for more information about Splash Window.
Step 4: Protect
To select the type of class protection.
To enable System Tray and Event Log function of generated exe for Windows.
- See Step 4: Protect page for usage of class protection.
- See Class Protection page for more information about Class Protection.
Step 5: Depend Jars
You can select depended jar libraries to be packed into exe file.
If one of the protect option is selected at the previous step, you can select depended jar files to be protected from being extracted.
- See Step 5: Depend Jars page for usage of adding depended jar files.
- See Depended Jars page for more about depended jar files.
Step 6: Output
The Output step is to select an exe file name to be generated. If it is for Windows, you can edit its version information and select icon files for it.
- See Step 6: Output page for usage of selecting an exe file name.
- See Icon and Version page for more details of icon files and version information.
Step 7: Finished
You can create a configuration file for generated exe by the help of "Configure Assistant" at the last step.
- See Step 7: Finished page for usage of configuration.
- See Generated Exe Configuration page for details of generate exe configuration.
Comments
General Artical
heipfull information for more detail visit link
Part of the application does not work
Hi, I have reporting part in my java application that is i create reports using dynamic reports https://dynamicreports.lbayer.com/
i have all the jar files in classpath it works on jar also on exe created with other tool but exe created using jar2exe does not print my report in my application could u please help me how could i solve this.
Remove license
How to remove the license from pc to install in other?
Only uninstall?
Add jar protected
How can I use a jar protected by means of the console.
So I do not see the option to do it
Add new comment